FreeUpscaler
Free tools run on your GPU · nothing uploaded

Denoise an Image

Grain and colour noise removed while edges stay hard, on your own graphics card. Free and unlimited — with the trade-off published as measured numbers, including where a paid learned denoiser still wins.

  • No sign-up
  • No watermark
  • Unlimited
  • Free tools never upload
The sample before processing
The same sample untouched, for comparison
Example · not your fileBeforeAfter

Drop images here

One at a time

Checking what this device can do…Leave the scale at 1× to clean the photo without enlarging it. PNG, JPEG and WebP in; PNG out.

How to remove noise from a photo, free and without an upload

Drop the photo into a browser tool that processes it locally. FreeUpscaler runs an edge-preserving bilateral filter on your own graphics card and hands the picture back at its original size — no upload, no account and no watermark.

Noise reduction is always a trade of texture for smoothness. Measured on twenty noisy photographs, the setting this page loads with removed the grain while leaving edge contrast completely intact, and the strength dial is where you choose how much texture to spend.

The point where it stops being worth it is measured too, and it is on this page rather than left for you to discover.

See it work

What does denoising a photo actually look like?

One night photograph carrying realistic sensor noise, cleaned at this page's default setting, next to the clean original. All three panes are 100% crops straight out of the evaluation run.

100%
Of edge contrast kept
the edge step does not move at all
0.1 s
For a four-megapixel photo
no download, laptop GPU
0
Files uploaded
everything stays in the tab
Free runs
no credits, no watermark
As it arrived — a 100% crop of the same frame

As it arrived · noisy — 33.9 dB, SSIM 0.885

Cleaned — a 100% crop of the same frame

Cleaned · default setting — 35.1 dB, SSIM 0.923

The clean original — a 100% crop of the same frame

The clean original · what the noise was hiding

The same photograph at 100%, cropped to 420 × 236 pixels — noise disappears in a shrunk image whatever you did to it, which is why every comparison here is a native-size crop. The speckle across the dark hillside goes; the lit windows and the illuminated sign stay where they were. This is the hardest of the ten images in this recipe — city lights are themselves high-frequency, so it gains less than the group average of 0.9445 — and it is here rather than a flattering one for that reason. Nothing was retouched.
Why it behaves this way

Why a plain blur is the wrong tool, and what this does instead

Noise is random variation between neighbouring pixels, so the obvious fix is to average neighbours together. That removes noise — and removes detail at exactly the same rate, because a blur cannot tell a random speck from an eyelash.

NOISE REMOVEDTEXTURE KEPTLight14%99%Medium52%95%Strong72%76%edge contrast held at 100% at every setting
A blur weights neighbours by distance alone, so it averages across an edge as happily as along it. A bilateral filter adds a second condition — how similar the neighbour's colour is — and pixels on the far side of an edge fail it, so they contribute nothing and the edge survives.

Inside a flat region — sky, a wall, skin — neighbours are similar, so they all contribute and the random variation cancels out. At an edge, the pixels on the other side differ too much in colour to earn any weight, so they are effectively ignored and the edge stays hard. That is not a tuning choice, it is what the second weight is for, and it is why the measured edge step does not move at any strength.

The same property is the limit. Fine texture is, to this filter, indistinguishable from noise — both are small variations between neighbours that do not form an edge. So texture is what you spend. A learned denoiser can tell the two apart because it has seen millions of examples of each; a formula cannot, and no amount of tuning changes that.

This is classical signal processing rather than a network, which is why it starts the instant you drop a file in and works with the network disconnected. The whole local pipeline, and where the site does use trained networks, is on how it works.

The catch

What each notch of strength costs you

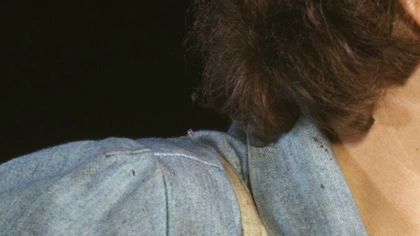
Texture, and here is how much. The same crop at the setting this page loads with and one notch up, from the same evaluation run.

Light — the default — a 100% crop of the same frame

Light — the default · denim weave and hair strands intact

Medium — a 100% crop of the same frame

Medium · smoother, and the weave is going

The clean original — a 100% crop of the same frame

The clean original · the reference both are scored against

One notch of strength, on a 1940s archive photograph carrying realistic sensor noise. Look at the denim twill and the individual hair strands. The middle pane is smoother — and it is measurably further from the right-hand pane than the left one is, which is the whole point of publishing this.
Noise settingOn realistic sensor noiseOn synthetic uniform noiseWins against the next notch up
Light — the default38.05 dB · SSIM 0.946437.10 dB · SSIM 0.92099 of 10 images
Medium36.69 dB · SSIM 0.930237.23 dB · SSIM 0.9328

The default is Light, and that is a measurement rather than timidity. Two noise recipes were run: one that adds uniform noise to every pixel, and one built to imitate a real camera sensor — chroma noise much stronger than luminance, in low-frequency blotches rather than per-pixel speckle, which is what demosaicing and chroma subsampling actually produce. On the realistic one, Light beat Medium on nine of ten photographs. On the synthetic one the order reverses.

The realistic recipe is the one that decides, because nobody arrives holding synthetic noise. If the grain is still visible after a run, go up a notch — that is what the dial is for, and Medium is the right answer for genuinely heavy noise. But starting there costs texture on the majority of photographs that do not need it.

Measured 31 August 2026 on an Apple M-series GPU in Chrome — twenty photographs over two noise recipes, four methods, 80 runs, plus a full sharpening-style × strength grid. The full record is in the repository as corpus/findings/denoise-image.md.

Which method

Why the picker has one entry

Six methods could technically run on this page. Five are not offered, and every cut is a measurement rather than a preference.

MethodWhat happened when it was measuredOffered
Soft — the one on offerClosest to the clean original of everything that runs here, and instant. 0.1 s for a four-megapixel photo, nothing to download.Yes
BalancedWas the first entry in this picker and could not run at all: it ships with noise reduction at zero, so every one of 20 test requests was refused by the planner.No — it was broken
Anime LinesThe same filter with sharpening tuned for line art. Lost to Soft on all ten inputs, in both noise recipes, at both strengths.No
Denoise (Trained)A 682 KB learned denoiser. Lost 19 of 20 by four to eight decibels, at 25× the processing time — it smooths photographic texture away wholesale.No
Photo · Photo (Grainy) · Anime (Noisy)All three only clean while enlarging. This page keeps your dimensions, so the planner greys them out with a reason rather than hiding them.No — cannot hold the size

The Balanced row is the uncomfortable one, and it is the reason this page was held back rather than shipped. It looked like a working option, it was the first thing in the list, and it would have refused every job. It was found by running the whole page’s corpus through the real planner rather than by reading the code — which is the argument for doing that on every page.

The trained option is untested rather than beaten, and the difference matters. What it was built for is film grain and scan dirt — noise that is part of the original photograph. Both recipes here add noise to a clean master, which is not its home ground. Measuring it fairly needs a corpus of genuinely grainy originals, which has no clean reference to score against and therefore does not exist yet. When it does, this option gets retested and this table gets rewritten.

Set expectations

What noise reduction can fix, and what it cannot

Most of what follows points at a number above. The last two are limits no filter gets around, and one of them is where a paid tool is genuinely the right answer.

  • Improves a lot

    Moderate grain and colour blotches

    Indoor shots at a middling ISO, phone photos in mixed light, scans of old prints. This is what the page exists for and what the numbers above were measured on: the grain goes and the edge step does not move.

  • Improves a lot

    JPEG colour noise

    The mottled colour patches a heavily compressed photo carries, especially in skies and shadows. Chroma noise in low-frequency blotches is exactly the shape the realistic test recipe imitates.

  • Improves some

    Night photography with a lot of small lights

    City lights and lit signage are themselves high-frequency, so a filter looking for high-frequency variation cannot fully separate them from noise. The night skyline in the run scored lowest of its group — 0.9226 against a group average of 0.9445. Keep the strength low on this material.

  • Improves some

    Photos where the texture is the subject

    Fabric, fur, foliage, film grain you wanted. The filter cannot distinguish fine texture from noise — that is the same property that preserves edges. Use Light, and compare before downloading.

  • Cannot be fixed

    Heavy high-ISO noise

    A hand-held shot in a dark room. Turning the strength up does not solve it: an extra notch past Strong measured further from the clean original, not closer, so the ceiling is the method rather than the setting. This is where a learned denoiser earns its price — Topaz DeNoise sits at #2 on this search result for a reason, and pretending otherwise would waste your time.

  • Cannot be fixed

    Banding and posterisation

    Flat stepped bands in a gradient are not noise — they are the opposite, too few distinct values rather than too many. Smoothing makes the steps softer without making them go away. That needs dithering, which is a different tool.

On grainy photos

Why is my photo grainy, and can this fix it?

Grain has one cause almost all of the time, and knowing it tells you whether software or a retake is the answer.

  • Not enough light reached the sensor. The camera compensated by amplifying the signal — that is what a high ISO number is — and amplification multiplies the sensor’s own random variation along with the picture. Everything else on this list is a version of this one.
  • A small sensor. A phone or compact camera collects far less light per pixel than a larger camera, so it reaches the amplification stage much sooner. The same scene is grainier from a phone, and no setting on the phone changes that.
  • Shadows lifted afterwards. Brightening a dark area in an editor amplifies whatever was recorded there, and what was recorded in near-darkness is mostly noise. Grain that appears after editing was always there.
  • It went through a messaging app. That is compression noise rather than sensor noise — mottled colour patches instead of fine speckle. This page handles it well, and it is worth asking the sender for the original anyway.

If the photograph is already taken, drop it in above and start at Light. If you can retake it, more light beats every denoiser there is, including the paid ones.

How to use it

Three steps, no account

Everything happens on this page. There is no upload to wait for and no email to confirm.

  1. Step 1

    Drop your photos in

    Drag one picture or a dozen onto the box above, or click to browse. Leave the scale at 1× to clean without enlarging — that is what it loads with.

  2. Step 2

    Judge it on texture, not on sky

    Drag the before/after slider over fabric, hair or foliage. Sky will look better at any strength; texture is where the price is paid, so that is where the decision is. Go up a notch only if grain is still visible there.

  3. Step 3

    Download it

    No watermark, no sign-up, no cap. The output is a PNG at the same dimensions you supplied, because re-encoding a freshly cleaned photo as JPEG would put a new kind of noise straight back in.

Why it is different

Free without an asterisk

Genuinely unlimited

No credit counter, no daily cap, no queue. Your GPU does the work, so the hundredth photo costs us exactly what the first one did: nothing.

Nothing is uploaded

Your photograph is decoded and processed inside this tab. There is no server in the loop and nothing for us to store.

No account, no watermark

No email, no sign-in wall before the download button, and no logo stamped across your result.

Works offline

Load the page, disconnect from the internet, and it still runs. That is the proof the privacy claim is real, and it takes ten seconds to check.

Starts instantly

Shader maths, not a network — nothing to download, no queue, and a four-megapixel photo finishes in about a tenth of a second.

The ceiling is published

Where a paid learned denoiser beats this, and where turning the dial up stops helping, are both on this page as measured numbers rather than left out.

More tools

Not quite the job you have?

FAQ

Frequently asked questions

How do I denoise an image for free?+

Drop the photo onto this page. It is decoded in your browser, cleaned on your own graphics card by an edge-preserving bilateral filter, and handed back at its original size — no upload, no account, no watermark and no limit. A four-megapixel photo takes about a tenth of a second, and nothing has to be downloaded first.

What kind of denoising is this?+

A bilateral filter. Each pixel is replaced by a weighted average of its neighbours, where the weight depends on two things: how close the neighbour is, and how similar its colour is. Pixels on the far side of an edge differ too much in colour to contribute, so edges survive while random variation inside a flat region averages away. It is a real edge-preserving denoiser and it needs no model download.

Is it as good as Topaz or Lightroom's AI denoise?+

No, and it would be dishonest to imply otherwise. Learned denoisers are trained on what real sensor noise looks like, so they can separate noise from fine texture in a way a mathematical filter cannot. This one is very effective on moderate grain, JPEG noise and colour blotches, and free with no limit. On heavy high-ISO noise from a night shot it starts trading fine texture for smoothness. Use the lightest setting that does the job.

Why is there only one method to choose from?+

Because the others measured worse, and one of them was broken. Six methods could technically run here. Three of them only clean while enlarging, which this page does not do, so the planner already rules them out. Of the three left: one shipped with denoising switched off and failed every single request in testing; one is the same filter with sharpening tuned for line art, which lost on all ten inputs in both noise recipes; and the trained option lost 19 of 20 by four to eight decibels while taking twenty-five times as long. A picker with one working method beats a picker with three where two do nothing useful.

Which strength should I use?+

Start with Light, which is what the page loads with, and go up only if noise is still visible. That default is a measurement rather than caution: on photos carrying realistic sensor noise, Light came out closer to the clean original than Medium on nine of ten test images. Strength buys smoothness and it is paid for in texture — one notch up is already enough to start losing a denim weave and individual hair strands.

Why does the result look soft or plasticky?+

The strength is too high for the amount of noise present. Drop a notch. Denoising is always a trade: past a certain point the filter can no longer tell fine detail from noise, and it removes both. There is no setting, in any tool, that removes all noise and keeps all detail.

Does it make my image bigger?+

No. It cleans the photo at the size you gave it — the scale stays at 1× and the output has the same dimensions as the input. If you also want it larger, enlarge it separately, and do it in that order: enlarging first spreads each noise speck over several pixels, turning small grain into larger blobs that are much harder to remove.

Does the sharpening fight the denoising?+

It would, which is why the sharpening is scaled back automatically as you raise the noise reduction. Without that, the sharpen pass would simply reinstate the grain the filter just removed. It is also why the gentler of the two available sharpening profiles is the one used here — measured against the line-art profile it was closer to the clean original on all ten inputs, in both noise recipes and at both strengths.

Will turning the strength all the way up remove all the noise?+

No, and past a point it makes things worse rather than better. Testing an extra notch beyond Strong moved the result further from the clean original, not closer — the ceiling here is the method, not the setting. A bilateral filter has a limit, and that limit is where a learned denoiser earns its price.

Is it free, and is there a watermark?+

Free with no limit and no watermark. No account, no credit counter, no export cap. Your own GPU does the processing, so an extra photo costs us nothing — hosted tools meter you because they rent hardware by the minute.

Do you upload my photo?+

No. The image is decoded and processed inside your browser tab. You can verify it in ten seconds: load this page, disconnect from the internet, and clean a photo anyway. It still works, because there was never a server in the loop.

More free tools on this site

Denoise an image right now

No account, no watermark, no limit. Drop a photo in and it is cleaned on your own machine.

Choose a file