Fix a Blurry Video
Soft edges narrowed frame by frame on your own graphics card. Free, unlimited, no sign-up — and this page publishes how much it recovers, what it costs, and which blur nothing touches.
- No sign-up
- No watermark
- Unlimited
- Free tools never upload
Drop videos here
Videos run one at a time
Checking what this device can do…MP4/H.264 and WebM open. The audio track is carried across untouched, at its original size.
How to fix a blurry video, free and without an upload
Drop the file into a browser tool that processes it locally. FreeUpscaler demuxes the video, decodes it frame by frame, narrows the soft edges on your own graphics card and re-encodes it — all inside the tab, with no upload, no account, no watermark and no length limit.
It recovers part of the definition, not all of it. Measured on nine clips softened by a known amount, the default method brought back 33.6% of the edge definition that was lost, and 50.2% at full strength.
Whether it helps at all depends on which kind of blur you have — soft footage improves, motion blur does not. The four kinds are further down, not hidden.
What does unblurring a video actually look like?
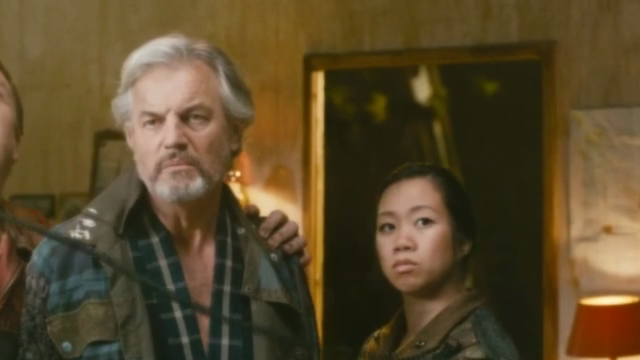
One frame from a clip softened by a known amount, run through this page's default method, next to the frame it came from. All three are 100% crops straight out of the evaluation run.
- 33.6%
- Of the lost edge definition recovered
- mean over nine test clips
- 0
- Files uploaded
- everything stays in the tab
- ∞
- Length, free runs
- no 30-second cap, no watermark
- 0 MB
- To download first
- on the default method
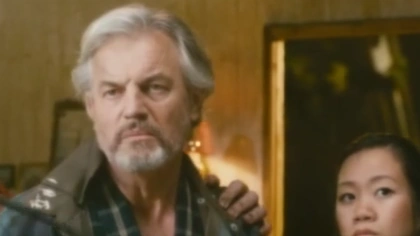
As it arrived · soft — edge gradient 19.7
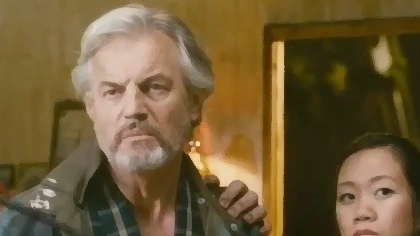
Fixed · Deblur (Light) — 22.0
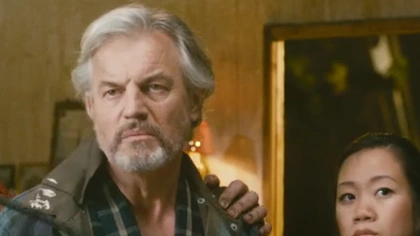
The original · what the blur removed — 24.2
How much clearer, on what kind of footage?
Nine clips, each softened by the same amount, each run through both available methods, each scored against the footage it came from. The unit is mean Sobel edge gradient; higher is closer to the original.
| Test clip | Deblur (Light)◆ | Anime (Restore) | At Strong | What it is |
|---|---|---|---|---|
| Motion graphics | 78% | 31% | 120% | AI-rendered announcement |
| Live action, wide | 61% | 26% | 82% | Tears of Steel, action |
| Live action, close | 50% | 16% | 71% | Tears of Steel, faces |
| Cel animation, 1942 | 41% | 13% | 58% | The Arctic Giant |
| Archive film, 1954 | 31% | 24% | 39% | Prelinger, 16 mm |
| Archive film, 1935 | 30% | 30% | 37% | Prelinger, 16 mm |
| Product, vertical | 20% | 4% | 34% | AI-rendered e-commerce |
| Graphic poster | 11% | 16% | 18% | Flat colour, few edges |
| 3D forest, dark | −19% | −39% | −7% | Sintel, soft rendering |
The default led on eight of the nine, and the last row is the honest one. That clip is a dark 3D-rendered forest, and it has almost no hard edges anywhere in the frame — the whole shot is soft rendering and shallow depth. A filter that works by steepening edges has nothing to grip, and what little it does is worth less than the re-encode costs. Both methods came out softer than the footage they were handed. If your video looks like that, the right answer is to leave it alone, and no tool in this category will tell you so.
The top of the range is not a promise either. The motion-graphics clip recovered 78% because it is made of hard synthetic edges — closer to a diagram than to footage. Real camera material sits in the middle of the table, at 30–61%, and the two archive-film rows are the closest thing here to what most people arrive with: an old transfer that has been through a couple of generations.
Measured 31 August 2026 on an Apple M-series GPU in Chrome — nine clips, two conditions, two methods, 36 runs, plus two sweeps of the strength setting. The full record is in the repository as corpus/findings/fix-blurry-video.md.
First work out why it is blurry — it decides whether anything will help
Every tool in this category promises to unblur anything. That is not how images work. Four common causes, very different prognoses, and telling them apart takes one paused frame.
- Improves a lot
Footage that is genuinely soft
A lens that is not especially sharp, a conservative camera profile, a platform transcode that stripped the high frequencies, an old transfer. This is what the page exists for and what 33.6% was measured on. The two live-action clips in the run recovered 50% and 61%.
- Improves a lot
Animation, graphics and screen recordings
Material made of edges rather than continuous texture is what an edge-narrowing filter is best at. The best result in the whole run was 78% on a motion-graphics clip, and a 1942 cel-animation clip recovered 41%.
- Improves some
Low-resolution footage on a big screen
The detail is there and there are simply too few pixels to show it. Narrowing edges makes the existing pixels harder, not the picture better. Enlarge it instead — the upscaler reconstructs at a larger size and does the edge work as part of the same pass.
- Improves some
Footage that already looks right
It will still change, and not for the better: the default pushed 11.7% past the original's own edge contrast on the untouched control clips, which on video shows up as edges that shimmer between frames. Use Anime (Restore), which stayed within 2.4%, or turn the dial down to Light.
- Cannot be fixed
Soft rendering and heavy atmosphere
Dark, low-contrast, fine-grained material with no hard edges — fog, smoke, deliberate shallow depth across the whole frame. The one clip in the run where every method went backwards. There is nothing for the filter to grip and the re-encode costs more than it adds.
- Cannot be fixed
Motion blur and badly missed focus
Each point of the scene was smeared across pixels while the shutter was open, or spread into a disc by the lens. The test takes one paused frame: if a stationary part of the picture is sharp and only the moving part is smeared, it is motion blur. Sharpening makes the smear itself crisper. That information is gone, not hidden.
Two methods, and they win on different things
Both qualified on capability and both earned their place — which is not the usual outcome. One recovers more definition; the other stays closer to your original footage. The measurement says which is which rather than leaving you to guess from the names.
| Method | Recovers◆ | Closeness to the source | Cost on already-sharp footage | Speed | Download |
|---|---|---|---|---|---|
| Deblur (Light) — default | 33.6% of the gap | Behind on all nine clips | +11.7% past the original | Baseline | None |
| Anime (Restore) | 13.4% of the gap | Ahead on all nine, both measures | +2.4% past the original | ≈ 3× slower | 924 KB, once |
The default is the one that does more, not the one that is better on every count. Deblur (Light) recovers two and a half times the edge definition on the axis this page is named for, needs no download and starts instantly — so it is what runs when you drop a file in. But it is measurably further from your source footage on every clip tested, and the reason is not subtle: it changes more pixels.
Anime (Restore) is a trained network, and despite the name it is not restricted to animation — it is offered here because it earned a place on live-action clips too. Its case is the conservative one: it was closer to the source frame on all nine clips on both measures, and on footage that needed nothing it barely moved anything at all. If the default gives you edges that look drawn on, this is the switch to make.
What it is not is the smarter option. The same network, on the same page’s settings, recovered 0.9% on still photographs — which is why the blurry-photo page does not offer it at all. It is a real option here and a measured non-option there, and both of those are the same measurement run twice.
And the strength dial behind the default
One setting, in the options popover, labelled Deblur, with three working steps. Each notch runs the edge-narrowing pass one more time, and on this page’s footage each is worth about sixteen more points of recovery.
| Setting | Recovered on soft footage◆ | Distance from the source | Overshoot when nothing was wrong |
|---|---|---|---|
| Light | 18.0% | 30.94 dB | +6.1% |
| Medium — the default | 33.6% | 30.59 dB | +11.7% |
| Strong | 50.2% | 30.08 dB | +15.8% |
There are three steps and no fourth — the dial buys iterations and the engine caps them at three, so Strong is the ceiling of the method rather than the top of an arbitrary scale. The ladder has not flattened by then, which is a polite way of saying the limit here is the technique, not the tuning.
The same ladder on still photographs runs 8.2% / 14.3% / 20.3% — less than half as steep. The difference is the material, not the code: footage arrives softened more gently than a photograph does, so there is more for an edge filter to grip and less that has been destroyed outright.
Where does the work actually happen?
In this tab, on your graphics card, one frame at a time — with no server in the loop at any point.
Demux, decode, filter, re-encode
The container is unpacked in the tab, frames are handed to the browser’s own video decoder, each decoded frame is uploaded to your GPU and run through the shader, and the results go back through the browser’s encoder into a new file. The audio stream is copied across as-is rather than decoded, so it neither loses quality nor drifts out of sync.
One consequence is worth knowing before you judge a result: the output has been through a fresh encode, and encoding costs a little edge contrast of its own. On genuinely soft footage the filter wins that exchange comfortably. On footage that was already excellent, the re-encode is most of what you are paying for.
Why we do not call it AI
The default is not one. It is a shock filter — a few lines of shader maths that ask which side of an edge each pixel belongs to and nudge it that way. There is nothing to download, it works offline, and it cannot hand back detail that was not derived from your own frames.
The second method is a trained network, and it is labelled as one, with its download size on the card before you pick it. Both run on your own machine, offline, for nothing.
The two that run somewhere else
Below them the picker carries AI Video Restore and Topaz Starlight. Both are restoration models on rented hardware, and both rebuild detail rather than recovering it — what comes back is a reading of what the frame probably held, which is a different promise from the two above and is why they are labelled separately. Using one means uploading the clip and signing in, because a run costs real money: the price comes from the length of your clip and sits on the button before anything is sent. The free methods never upload a file.
The full pipeline is on how it works.
Three steps, no account
Everything happens on this page. There is no upload to wait for and no email to confirm.
- Step 1
Drop your files in
Drag one video or a dozen onto the box above, or click to browse. The page checks what your device can handle before you choose a file, so you learn about limits up front rather than half-way through a job.
- Step 2
Judge it on real detail
Drag the before/after slider over hair, fabric, foliage or type — not over a flat wall, where by definition nothing changes. If the after side shimmers or looks brittle, switch to Anime (Restore) or drop the dial to Light and re-run.
- Step 3
Download it
No watermark, no sign-up, no cap on how many times you do it. The audio track is copied across in its original form, so it loses nothing and stays in sync.
Free without an asterisk
Genuinely unlimited
No credit counter, no daily cap, no 30-second trim. Your GPU does the work, so a hundredth clip costs us exactly what the first one did: nothing.
Nothing is uploaded
Files are decoded, filtered and re-encoded inside this tab. There is no server in the loop and nothing for us to store.
No account, no watermark
No email, no sign-in wall before the download button, and no logo stamped across your result.
Works offline
Load the page, disconnect from the internet, and it still runs on the default method. That is the proof the privacy claim is real, and it takes ten seconds to check.
Starts instantly
The default is shader maths — no model download, no queue, and processing starts the moment you drop a file in.
The cost is published
The clip where every method made things worse is in the table above, with its number. That is the row a marketing page leaves out.
Not quite the job you have?
Upscale a video
For footage that looks soft because it is small. Reconstructs at 2×, 3× or 4× and does the edge work in the same pass.
OpenSharpen a video
The same filter aimed at footage that is fine but flat, with its own measurements and a gentler second option.
OpenFix a blurry picture
The same method on stills — where it recovers 14.3% rather than 33.6%, and where the trained option did not earn a place.
OpenEnhance photo quality
More resolution and crisper edges, for stills that are small or soft.
OpenFix a pixelated photo
Rebuild blocky squares and stair-stepped edges into smooth gradients.
OpenDenoise an image
Edge-preserving noise reduction, with the trade-off published as measured numbers.
OpenFrequently asked questions
Can you actually unblur a video?+
Partly, and it depends on the cause. On nine clips softened by a known amount, this page recovered an average of 33.6% of the edge definition that was lost, and up to 78% on the best of them — a real improvement and a long way from restoring the original. Footage blurred by camera shake or by the subject moving during each exposure cannot be recovered at all: that information was smeared across pixels while the shutter was open. The before/after slider tells you which case you have within seconds.
How do I fix a blurry video for free?+
Drop the file onto this page. It is demuxed and decoded frame by frame in your browser, each frame has its soft edges narrowed on your own graphics card, and the result is re-encoded locally — no upload, no account, no watermark and no length limit. Nothing has to be downloaded first if you stay on the default method.
Which of the two methods should I use?+
Start with the default, Deblur (Light). It recovers 33.6% of the lost edge definition against the trained option's 13.4%, it is three times faster, and it needs no download. Switch to Anime (Restore) if the result looks brittle or if your footage was only slightly soft: it changes the picture much less — 2.4% past the original's own edge contrast where the default goes 11.7% past — and it was closer to the source frame on all nine test clips. It costs a 924 KB download and about three times the processing time.
How much clearer does the footage actually get?+
Between 11% and 78% of the lost edge definition came back across the nine test clips, averaging 33.6% at the default setting and 50.2% at Strong. Live-action clips recovered 50% and 61%; a 1942 cel-animation clip recovered 41%. One clip went backwards — a dark 3D-rendered forest scene with almost no hard edges anywhere in the frame.
Will it make footage that was already sharp look worse?+
It will overdo it, and the number is published. Run on the same nine clips with no softening applied, the default setting pushed edge contrast 11.7% past the original's own; the trained option stayed within 2.4%. On video that reads worse than on a still image, because over-sharpened edges shimmer between frames rather than just looking hard. If your footage is only slightly soft, turn the Deblur dial down to Light or switch methods.
Is there a length limit or a watermark?+
No limit, no watermark, no account. Processing runs on your own graphics card, so a long clip costs us exactly nothing — which is why hosted tools cap you at 30 seconds or stamp the output and we do not. The practical limit is your own patience and GPU memory.
How long does it take?+
Usually less time than the clip runs for, on the default method. Frames are demuxed and decoded directly rather than played back, so the job is not tied to the running time — frame size and frame count are what cost time. The trained option is about three times slower. It keeps going if you switch tabs, though very long jobs are safer left in front.
It says my browser cannot decode the video. Why?+
Browsers ship a deliberately narrow set of video decoders: MP4 with H.264, and WebM. MOV from an iPhone, MKV from a download, ProRes from an editing suite and most H.265 files are outside that set, so the page cannot read them at all. Converting the file to MP4/H.264 first solves it.
Does the audio survive?+
Yes, and untouched. The encoded audio is copied straight from the source into the output rather than decoded and re-encoded, so it loses no quality and stays in sync. If the output container cannot hold that particular audio codec, the result screen tells you before you download.
Is my video uploaded?+
No. It is decoded, processed and re-encoded inside your browser tab, on your GPU. Disconnect from the internet after the page loads and it still works — there is no server in the loop.
Should I unblur the video or enlarge it?+
If it looks soft because it is small — 480p or 720p on a big screen — enlarge it instead: reconstructing at a larger size is what recovers apparent detail, and edge work happens as part of that pass. This page leaves your dimensions alone and is for footage that is already the right size and still looks soft.
More free tools on this site
Fix a blurry video right now
No account, no watermark, no length limit. Drop a file in and it is processed on your own machine.
Choose a file